A Step-by-Step guide to scanning, organizing, and storing your paper documents and photos
My life has changed (for the better) by digitizing my personal files that I’ve been lugging around for last 20 years. Not only did I rid my home of three bulky, overflowing file cabinets, I’ve also enhanced the way I access these documents and photos. Imagine being able to:
- Find information that was in an old hand-written note from a college class you had 10 years ago…. Instantly. From your cell phone.
- Locate all pictures you’ve ever taken that included a dog – without ever manually specifying that the picture contained a dog!
- Quickly see all pictures of your great-grandmother, even her baby pictures, all without having to waste time tagging photos.
- Type a month and a year into Google search, and instantly pull every single piece of mail received during that time.
I’ve outlined the process I’ve been using for almost 8 years below. There are some alternate ways of scanning these days: iPhone apps where you just take a picture using your phone, for example. But I have found that to consistently get uniform and quality results, a desktop scanner is still the way to go. I also believe it is much faster to use a scanner if you have stacks of documents. The scanner listed above can scan the front and back of about 40 pages at a time. That would take forever on an iPhone!
Step One: Get the gear
I’ve gone through 3 scanners and 2 different shredders in my life, but my recommendations below show you the items that have worked very well for me (multiple years of heavy use without issue). This is the set up I use nearly every day:
- A good duplex scanner. This is the most expensive part, but will pay for itself over time, and with a gentle touch, will last for many years. I use (and recommend) a Fujitsu ScanSnap.
- A solid shredder (or a secure shredding drop-off service).
- A rubber “SCANNED” stamp – this seriously comes in handy!
- A free Google Account. We are going to use Google Drive to store your files in the cloud. There are other services available, such as DropBox, OneDrive, or Evernote, but this tutorial will focus on Drive, because I’m very familiar with some of the undocumented “gotchas” when it comes to searching documents in Drive. We will also make use of Google Photos to store and organize our photos, and its nice to have everything on one service, right? For Now, just bookmark drive.google.com and photos.google.com.
Step Two: Plan
For documents, there are two things we need to work out before getting started: our folder structure and our file name convention as they will be stored on Google Drive. This is the hardest part, so don’t skip ahead until you’ve really digested this. While most of this process can be adjusted and “figured out” along the way, screwing up your organization strategy is a royal pain to fix later.
2-1: Deciding a folder structure (or deciding not to have one):
I’d guess that 90% of the time, most people SEARCH to find what they are looking for in Drive (instead of clicking through a hierarchy of folders). But from time-to-time, I like to be able to go into a specific folder and see everything in it – just like a real file cabinet. I also enjoy the added organization a folder structure gives to my digital file cabinet. Also, if you choose option a, you will find yourself spending much more time on your filename convention. For example, if you do not rely upon a folder structure, you can’t just name a document “2008 Insurance Policy” – without a folder structure, you wouldn’t know anything about that document.. is it a home insurance or car insurance? Was it with State Farm or Progressive? With option a, you’d end up having to specify all of that in filename for every file, and that gets old real fast. Now choose wisely:
- Option A: Skip folder organization altogether (not recommended). Simply rely on good filenames and searching the text within the document.
- Option B: named folder hierarchy for easier browsing / contextual clues
I would recommend Option B for a few reasons:
- Sometimes it is useful to have a folder full of otherwise unrelated documents (like tax documents for each year)
- I like to store my receipts by year to make them easier to browse
- Storing thousands of documents in a single folder causes weird problems
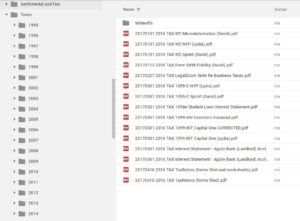
Here is what my tax folders look like (click to enlarge):
When you first open your Google Drive account, there wont’ be any folders listed.
2-2: Deciding a file naming convention:
A few years ago, Google changed the way searches worked within Google Drive. When I started down this path, I chose the following format (don’t do this – keep reading):
YYYYMMDD_DirectCategory_Document_OptionalDetails.pdf (bad – do not do this)
This allowed me to search by date… for example, if I wanted to see everything from May of 2008 (across all folders) I could just search for “200805”
BUT Google has since changed how this works, and does not search within contiguous blocks of text. In other words, the search of “200805” will not result in anything now (unless it was found within the document).
So here is my recommendation for anyone just starting out:
YYYY MM DD DirectCategory DocumentName OptionalDetails OptionalNumber.pdf
Some examples:
- 2017 08 15 New York Life IRA Statement.pdf
- 2017 09 01 Receipt Walgreens 1.pdf
- 2017 09 01 Receipt Walgreens 2.pdf (Two Walgreens receipts in the same day)
- 2017 09 16 Receipt Target Corner Table.pdf
Add dashes to your personal preference, but just remember to use spaces to make the titles searchable:
- 2017 08 15 – New York Life – IRA Statement.pdf
- 2017 09 16 – Receipt – Walgreens.pdf
This format allows searches like “2008 05” to find all May 2008 documents.
Step Three: Scan
My own personal process is as follows:
- Use the ScanSnap manager / button on the scanner to scan an indexed PDF, name the file properly in ScanSnap interface.
- Once file is saved to disk, I open it in Adobe acrobat to make any adjustments – including deleting blank pages, fixing the orientation of some pages, etc. Save file again.
- Once I am done scanning for the day, I use the Google Drive web interface to upload the files.
- I move the uploaded files off into an archive directory that I keep around for a few months before deleting.
Some other tips:
- Last I checked, Google won’t index PDF files larger than 10MB. Adobe Acrobat has a nice feature which allows you to split a PDF by size. When scanning in a large document or notes from a class, I first make the monster PDF, then break it down in MB chunks, and then upload both versions.
- Organize your pile of documents before scanning. Scanning single papers at a time is a real time killer.
- Keep your scanner oiled – you also may need to replace the rubber roller feeder after your first 100k sheets or so.
Step Four: Upload
- I recommend using the Google Drive web interface to upload your files.
- After a near disaster using the Google Drive windows application, I’ve grown to distrust any sort of synchronizing mechanisms when it comes to huge libraries of files. Moving around thousands of files (or renaming folders) on physical disk could possibly take a long time. Trying to sync to Google while that file copy or move operation is in flight is a recipe for disaster. Google will think half of your files are gone, and creates a real mess.
Step Five: Shred
For security purposes, I like to shred nearly everything once I’m sure my library is working well. A few physical items I hang on to:
- IDs (duh)
- Any kind of certificates (professional certs, etc)
- Anything notarized
- Anything sentimental – sometimes its nice to actually hold the newspaper article or whatever
Step Six: Back up
Coming soon!
 A chain of Zero-day exploits was used to
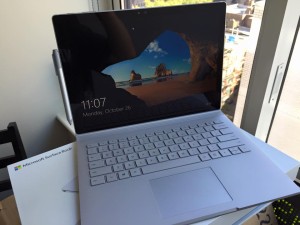 Got the Microsoft Surface Book this morning, and have been fairly impressed so far with this new device. After playing some games, streaming my Xbox-One, and doing some work on it, I am really liking the specs of both the full unit and the detached tablet.
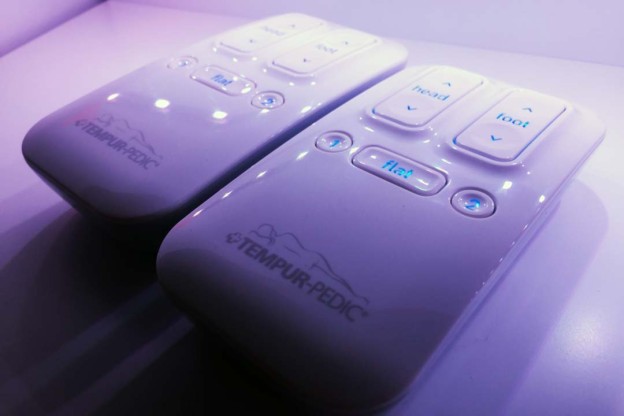
 Programming an additional remote to operate our TempurPedic Ergo Plus adjustable bed was not very intuitive, so here are the instructions on how to add another remote control to your unit: